
Kartana, Celesteela and Mega Heracross are coming to Pokemon Go Raids in April, get your remote raids on the Pokebattler Raid Party app!
Shadow Raids are here! Get your Shadow Entei and Shadow Mewtwo counters ready!

Determining Which Gyms will Get you Ex-Raid Passes for Mewtwo: Part 2
In my earlier article, I outlined how EX raid eligible gyms are determined based on OSM data from 2016 and level 20 s2 cells. In this article, I will explain how we can use that information to generate a custom Google Map showing which gyms are eligible for EX raids, and which gyms are not.
Step 1: Construct a list of gym names, latitudes, and longitudes.
This is potentially the most time-consuming step, particularly if you want to create a map for a large area. You need to make a CSV (comma separated values) file listing the name, latitude, and longitude of each gym in the selected area.
There are a number of third-party websites which show Pokemon Go gyms. One method of collecting data can be copying the latitude and longitude details from these websites (usually they contain a ‘Get Directions’ link or similar which lists the latitude and longitude in the URL). It is also possible to export portal data from the Ingress Intel website (/u/budude2 described the steps for this here) but this will also include all Pokestops and will need to be edited to only include gyms.
You could try asking others in your community whether anyone else has access to a gym list. If you do receive the list, just check a few gyms to make sure that the coordinates listed are accurate. If no one has a list available and you are taking on a big project, you might be able to distribute the task to a few people to make the job more manageable.
You can construct your list in any text editor or Excel. If using Notepad, just make sure each line follows the format of ‘gym name, latitude, longitude’ (but don’t actually include that line as a header). Remove any commas from the gym name and then save your file as gyms.csv (not gyms.txt). You can also do this in Excel, using columns A-C for the gym name, latitude and longitude respectively and save it as a CSV file.
Your final document should look similar to the following:

Step 2: Export the OSM data for the selected region
Go to the following link: http://overpass-turbo.eu/s/vs3
If the link loads correctly you should see the following text on the left-hand side:
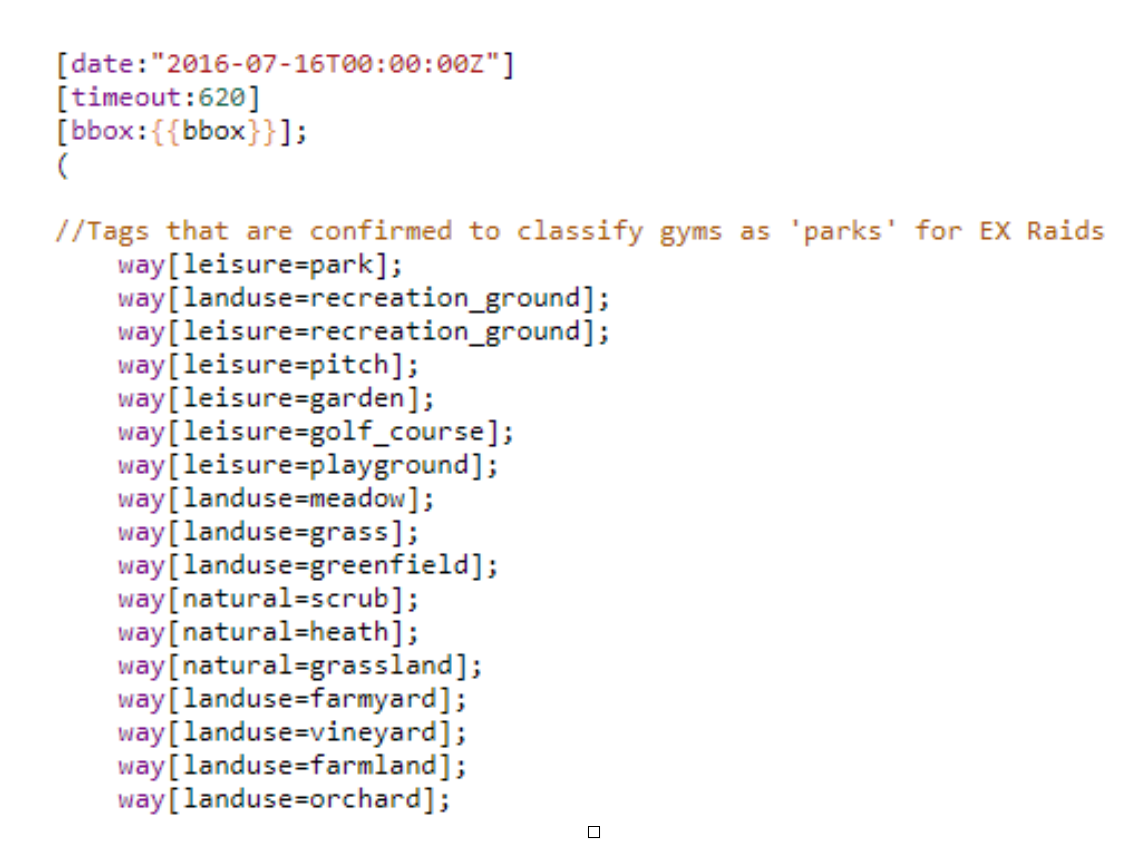
The first line in this code controls what date the OSM data is pulled from. The linked query sets the date as 16 July 2016, the earliest possible date for the data. If you are interested, you could try changing the query to 31 August 2016 to see if there are any difference in the final results. Some gyms may have questionable eligibility if they are eligible under one date but not another.
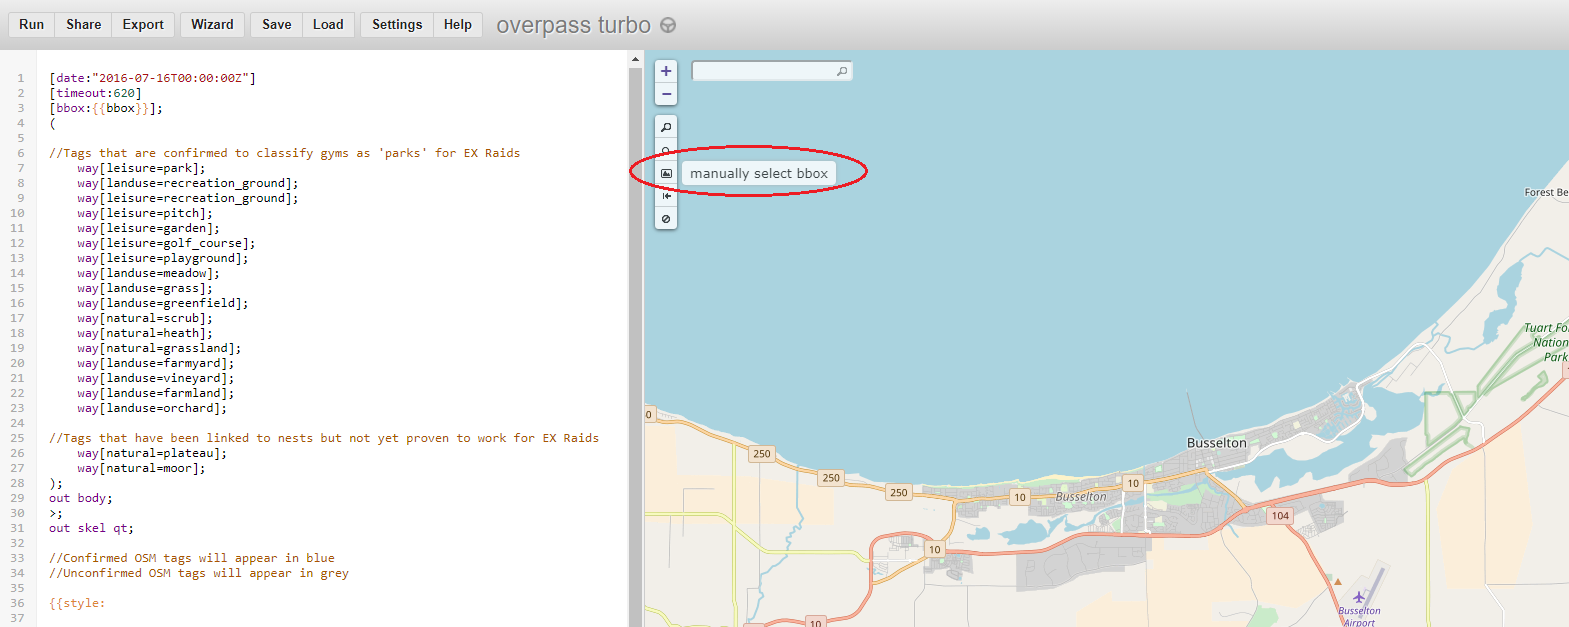
To control the area the query runs over, select ‘manually select bbox’ and then draw a rectangle over the area of interest. Be sure to include all regions corresponding to your gyms.
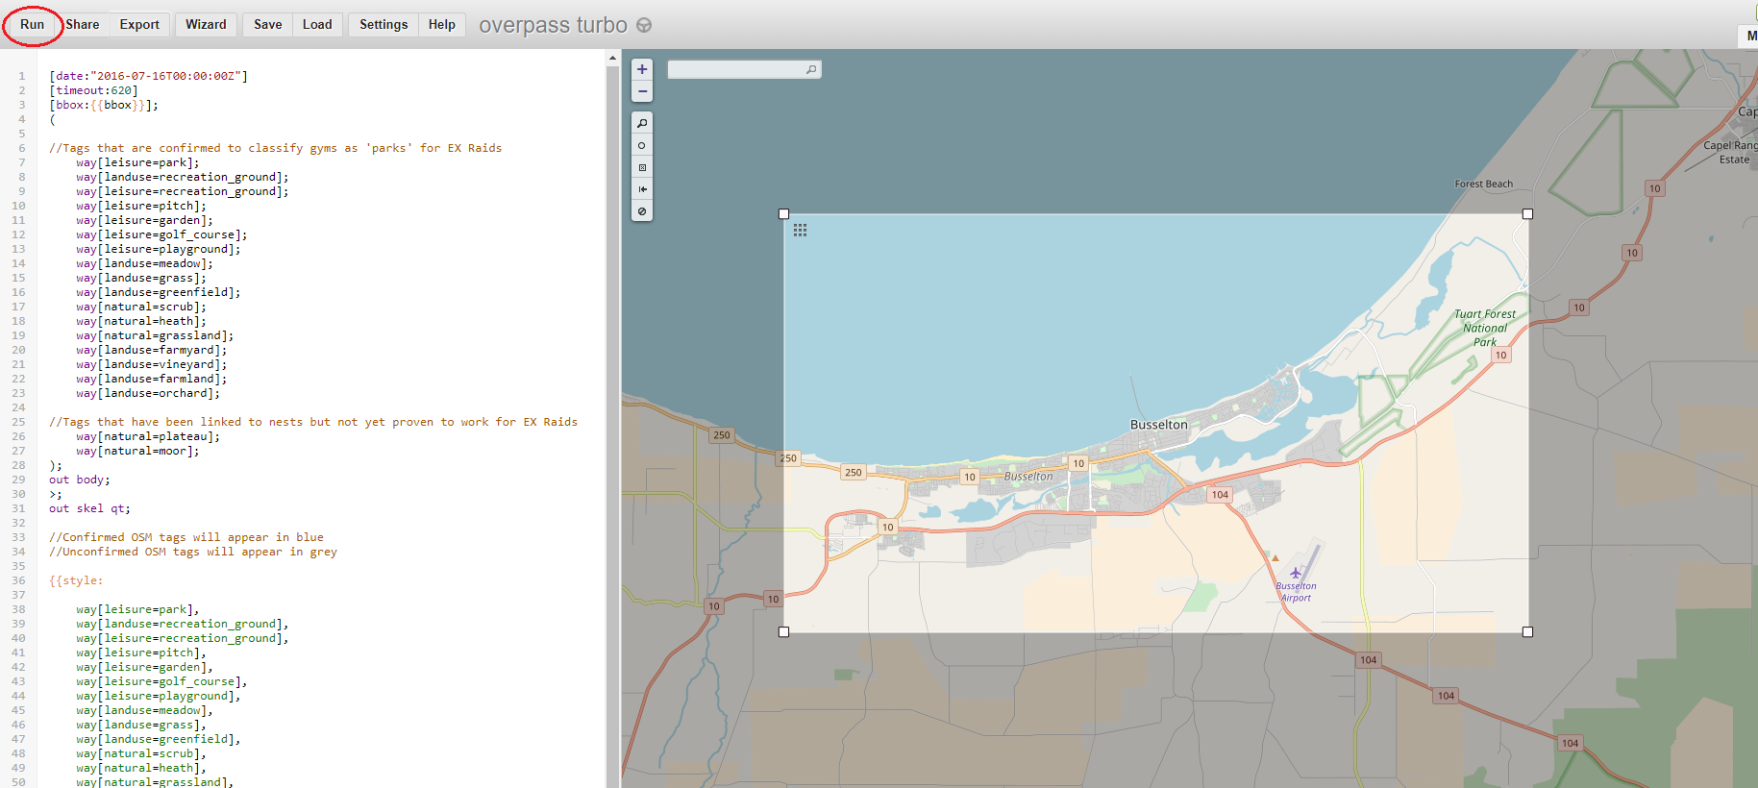
Once your bbox is drawn, click Run to find the OSM tags in the selected area. If you are doing this for a large area then this may take some time to complete.
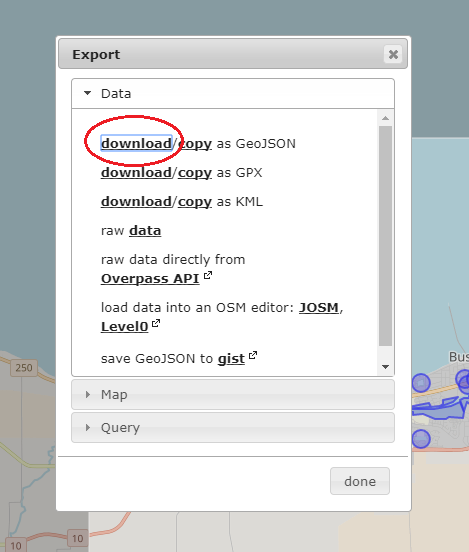
After the data has loaded, click on ‘Export’ and then ‘download as GeoJSON’.

Rename the file if desired (I renamed mine to osmdata.geojson) and move it into the same file as the gyms csv.
Step 3: Download osmcoverer
WINDOWS USERS:
Go to https://github.com/MzHub/osmcoverer/releases and download the latest release (at time of writing, this is osmcoverer_2.2.1_windows_64-bit.zip). Extract osmcoverer.exe and place it in the same folder as the gyms.csv and your OSM export.
Launch ‘Command Prompt’. You will need to change the directory to the folder where osmcoverer is located. To do this, type: cd “folder location”. e.g. cd “C:\Users\yourusername\Documents\map project”. If you drag the folder into Command Prompt it will auto-fill in the folder location details.
If you type osmcoverer -h then it should now display a list of different command inputs that osmcoverer can take. If this works then you are in the correct folder.
MAC USERS:
Go to https://github.com/MzHub/osmcoverer/releases and download the latest mac release (at time of writing, this is osmcoverer_2.2.1_macOS_64-bit.tar.gz). Extract the file and place it in the same folder as the gyms.csv and your OSM export.
Launch ‘Terminal’. You will need to change the directory to the folder where osmcoverer is located. To do this, type: cd folder\ location (with a backslash before any spaces in the folder location). e.g. cd /Users/yourusername/Documents/map \project. If you drag the folder into the terminal it will auto-fill in the folder location details.
In terminal type:
chmod +x osmcoverer
Then type:
./osmcoverer -h
It should now display a list of different command inputs that osmcoverer can take. If this works then you are in the correct folder. Note that compared to the Windows command, the Mac command starts with “./”. You will need to add “./” to the start of each command for Step 4 and Step 5.
Step 4: Generate a level 12 grid of the gyms
Each wave of EX raids, only one gym per level 12 s2 cell is selected. It will be useful to include a level 12 grid on our final map.
In Command Prompt, enter the following command:
osmcoverer -grid=12 -markers=gyms.csv -skipfeatureless
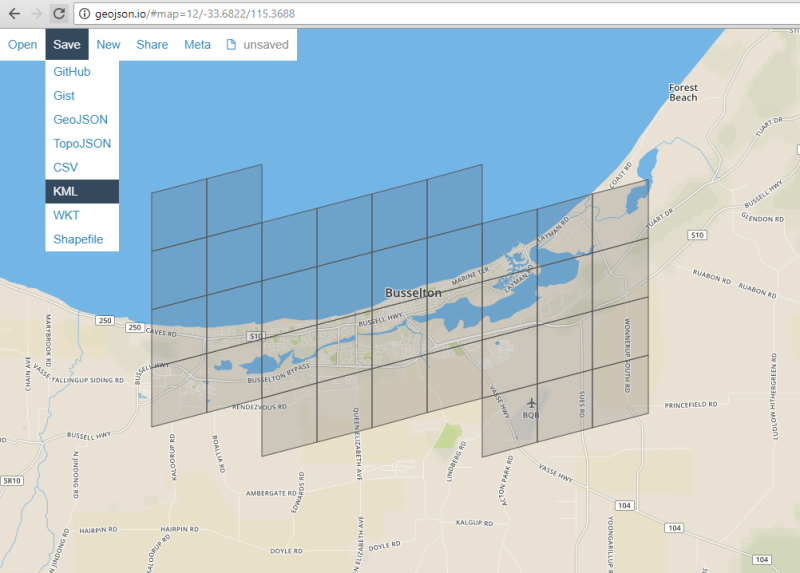
In the folder containing osmcoverer you will now find a subfolder called Output, and inside is a file called output.geojson. This contains the level 12 grid that covers your cells.
Google Maps cannot accept GeoJSON file inputs, so we will need to convert this to a KML file. This can be done by going to https://geojson.io. Click Open, File and select output.geojson. Once it has loaded, click Save and KML. Rename your KML (e.g. grid.kml) and move it to a location where you will be able to find it again later.
Step 5: Generate a list of gyms which are eligible for EX raids.
Now we will create a list of EX raid eligible gyms. osmcoverer will achieve this by checking whether the center of the level 20 cell containing each gym is inside a polygon from the overpass-turbo export.
In the command prompt, type:
osmcoverer -markers=gyms.csv osmdata.geojson
Inside the output folder, there will be a new file called markers_within_features.csv. This contains a list of all of the EX raid eligible gyms. Rename this to gyms-eligible.csv. Open it up in Notepad and add a new file at the top of the document saying:
Gym name,latitude,longitude
When I create my maps, I like to also show the ineligible gyms as this can help to orient me when looking at the gym map. Currently, osmcoverer does not generate this by default, but this can be done manually. Copy and paste your gyms.csv and rename it gyms-ineligible.csv. Edit the file in notepad to remove any of the eligible gyms, and add the same header to the first row.
If you are doing this process for a very large list of gyms, it may be worthwhile using Excel to speed up the process. If you paste your full gym list into Column A and your eligible gym list into Column B, the following formula will list the gym details only if it appears in the full list but not in the eligible list.
=IF(ISERROR(MATCH(A:A,B:B,0)),A1,””)
Step 6: Combine the data in a Google Map
Go to https://www.google.com/maps/d/?hl=en and log in if necessary. Click ‘Create a New Map’.
Give your map a title and click ‘Add Layer’ twice so that you have three empty layers.
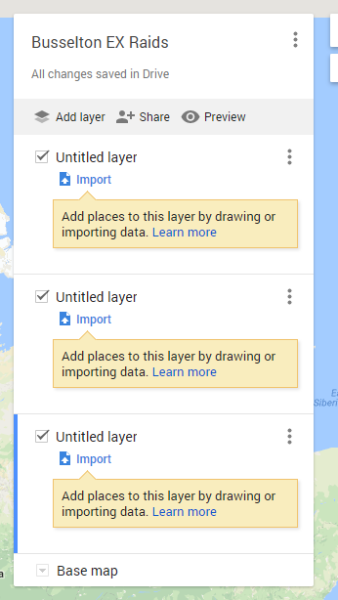
Into one of the layers, click ‘Import’ and find grid.kml.
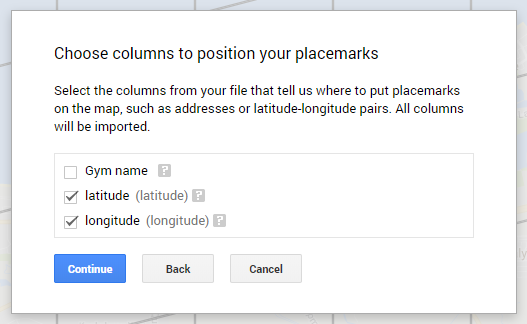
Into the next layer, click ‘Import’ and find gyms-ineligible.csv. It should auto-select latitude and longitude for the position columns. Click name and select gym name for the titles.
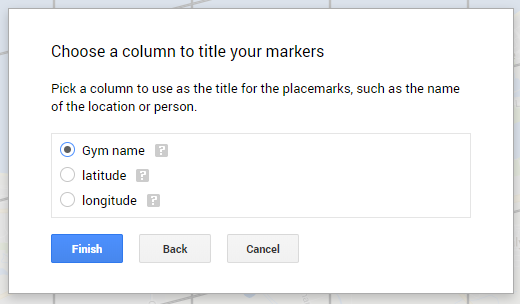
Into the final layer, click ‘Import’ and find gyms-eligible.csv.
You should now have all of the markers on the map, but there won’t be any way to distinguish between eligible and ineligible gyms (yet)!
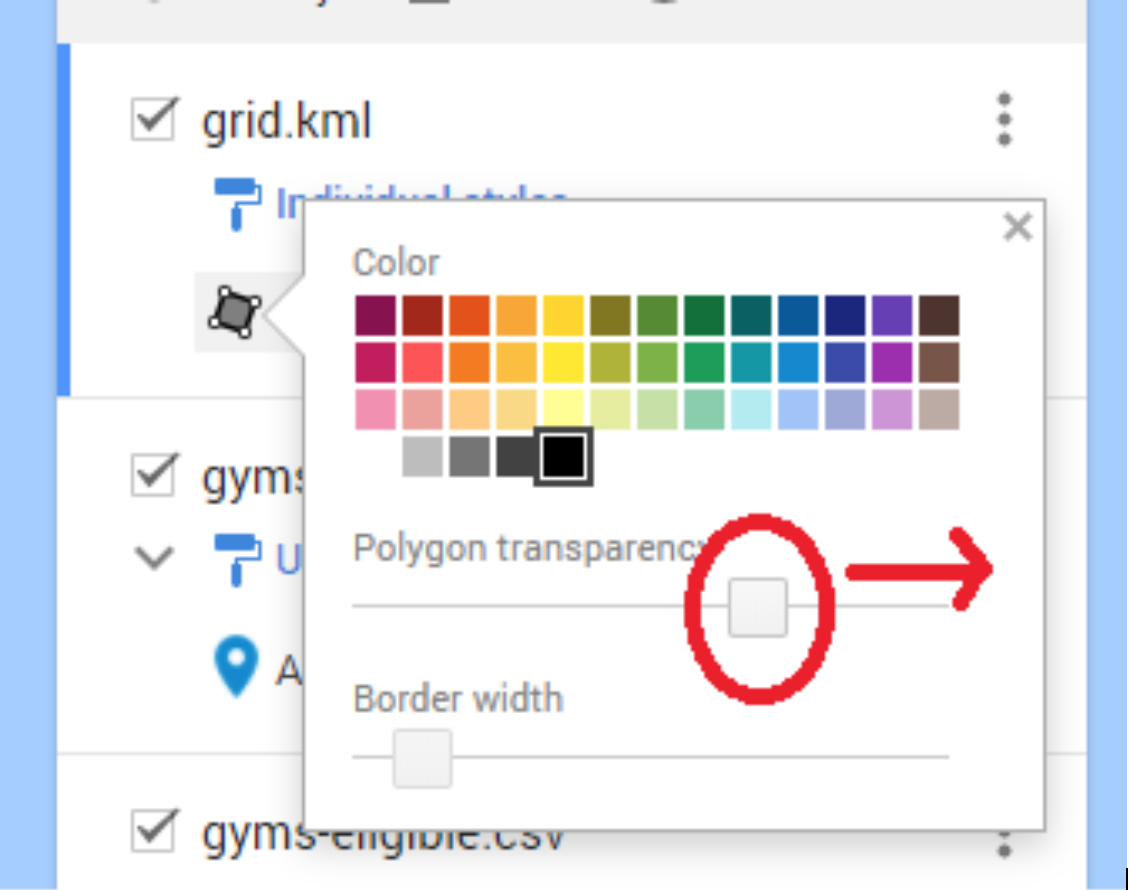
Click the paint bucket icon next to the grid polygon and increase the transparency to 100%. This will remove the shading between the gridlines but keep the gridlines themselves. If you want to change the color or width of the gridlines you can also do this.
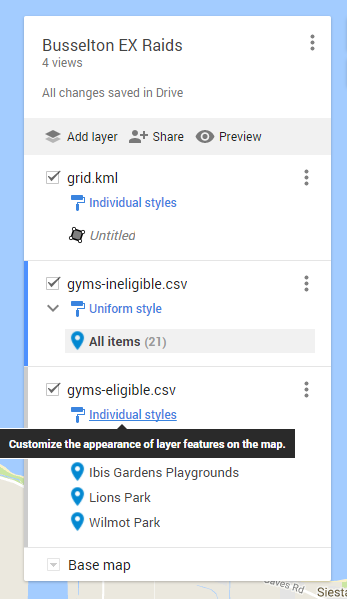
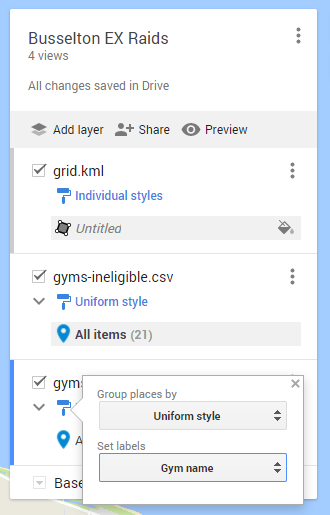
My data only had a small number of eligible gyms, so each gym was listed separately. To change it so that all markers in this category have the same style, click ‘Individual styles’. Change it to ‘Uniform style’. Also, while you are here, change ‘Set labels’ to be gym names. This will display the name of the gym next to eligible gyms.
Use the paint bucket to change the marker style for the eligible and ineligible gyms. This can be your choice of color and marker styles. I originally made my maps using red and green markers, but after receiving feedback from a color-blind user I changed my style to be yellow ticks and blue Xs.
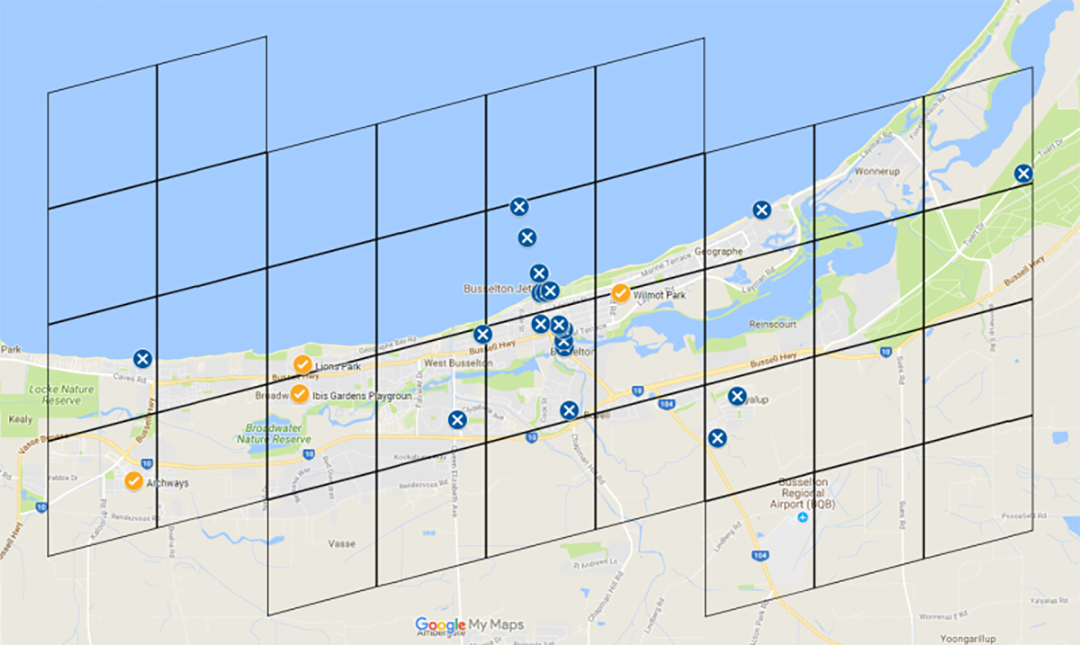
Here is what the final product looks like:
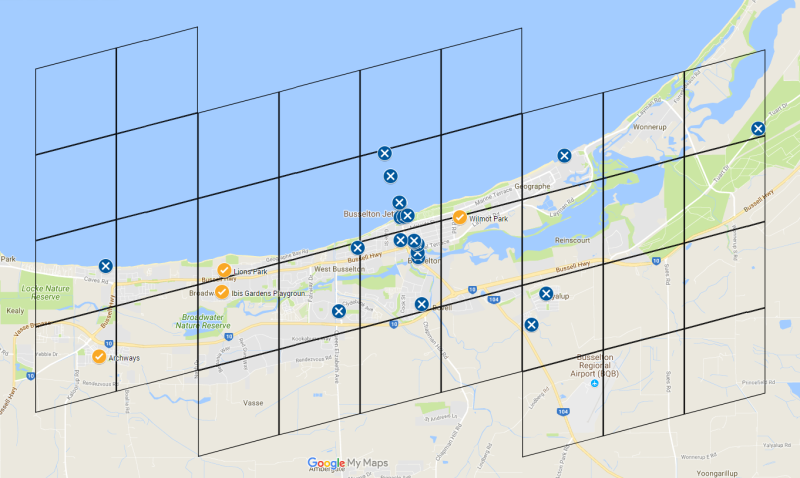
A few notes about the map:
- If the grid layer is selected and you try to pan the map, sometimes you will end up moving the gridlines. Undo with control-Z or the undo button. Clicking on one of the gyms should allow you to pan the map correctly.
- You can click the Share button to share the maps with others. If you do so, I recommend setting the permissions to be View Only, as it is too easy to accidentally mess up the gridlines when you have edit permission.
Hopefully, this allows you to better coordinate your communities raiding efforts, leading to more efficient uses of passes for those chasing an EX raid.
©2016-2022 Pokebattler.com™. All rights reserved by their respective owners.
Pokebattler™ is not officially affiliated with Pokémon Go and is intended to fall under Fair Use doctrine, similar to any other informational site such as a wiki.
All Pokémon Go trademarks, copyrights etc are held by Niantic, Inc.; Pokémon; and Nintendo / Creatures Inc. / GAME FREAK inc. Pokémon and Pokémon character names are trademarks of Nintendo.